Sunday, March 26, 2023

Week Five, The end of March

 Welcome dungeon delvers, to our wrap up of March's Dungeon 23 dungeon! This month's dungeon had a lot to offer, demon lords, black libraries, gravity changing rooms, traps of all kinds, and mountain of gleaming, shinny treasure! This week we wrap things up by adding more treasure rooms, a lair of gelatinous danger, and a rival party of adventurers who may help, or hinder player's progress. We also have the Encounter Table and full-month map at the end of the article for you. Read on to find out how this month wraps up!


Week 5


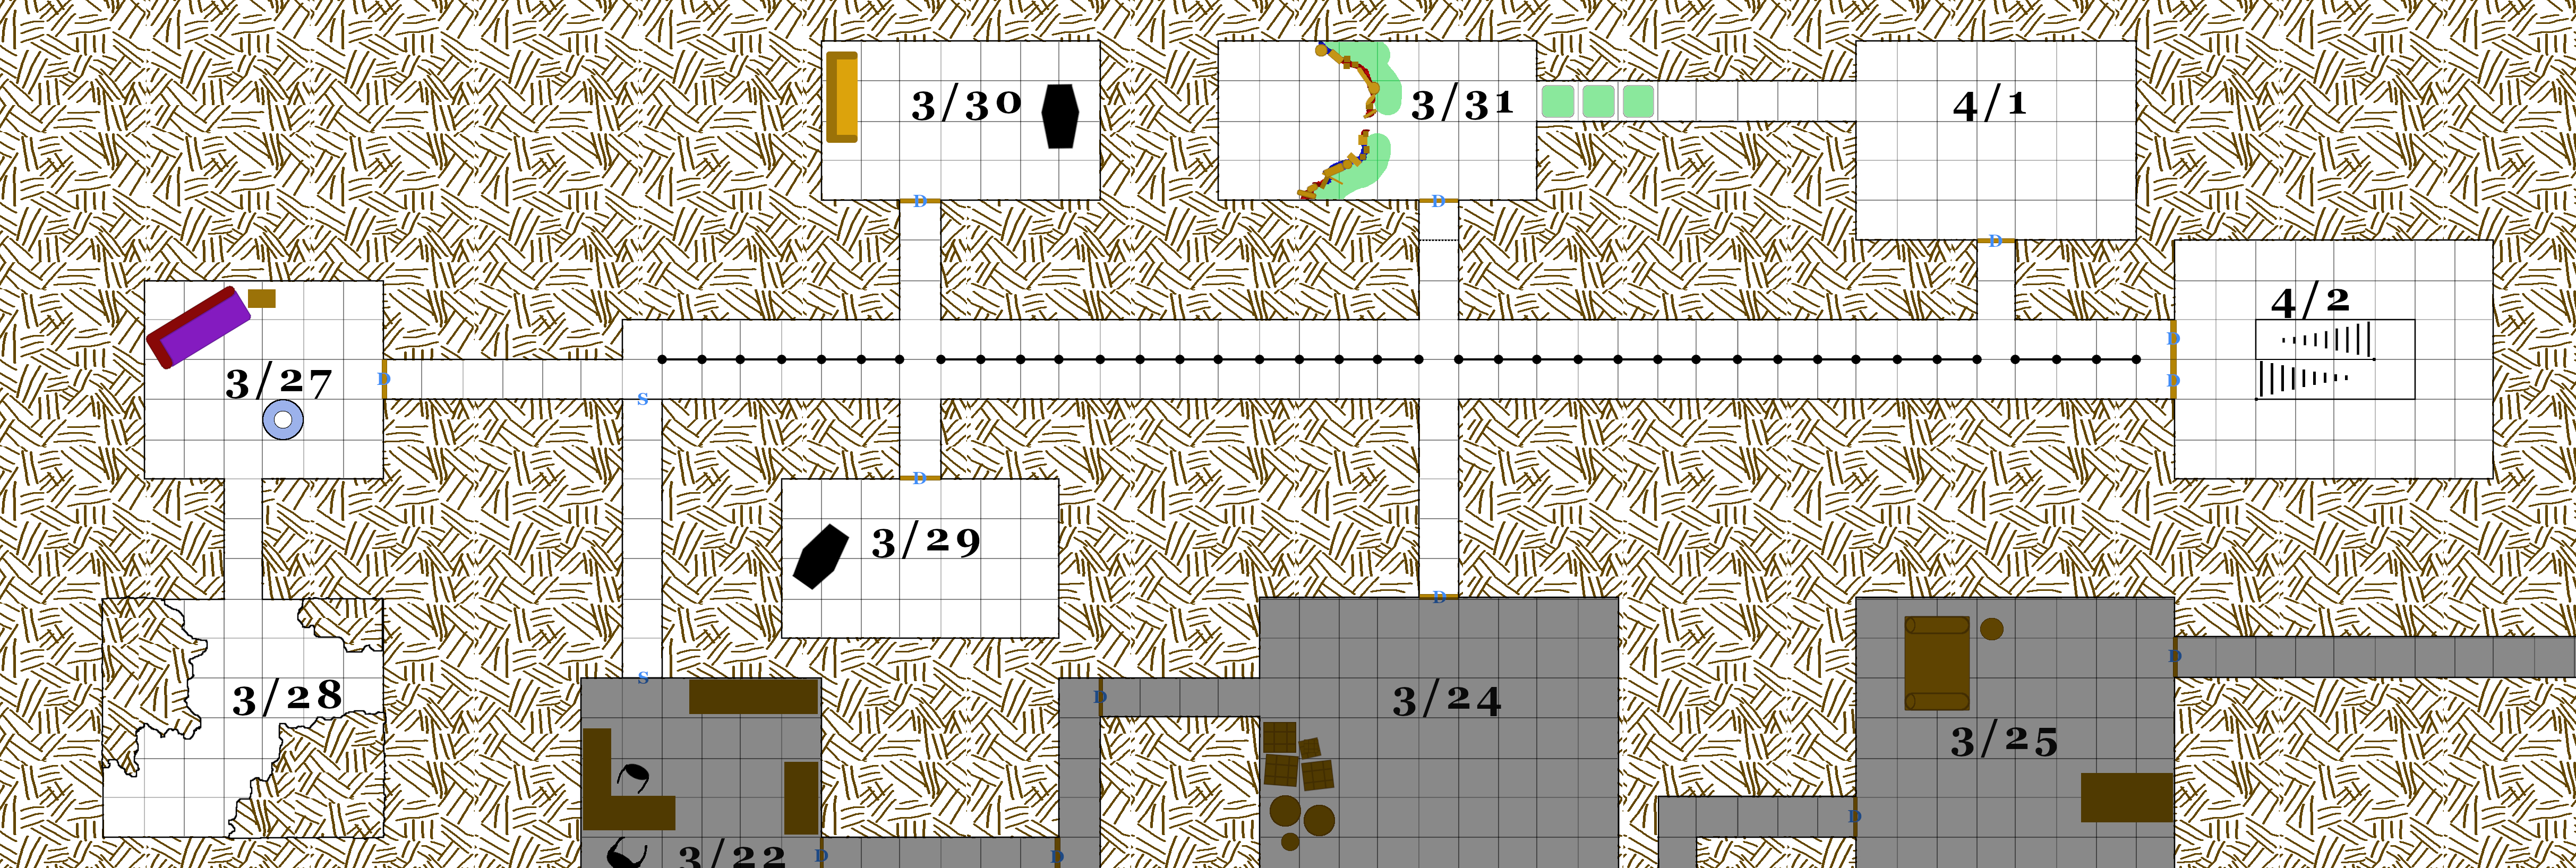
3/27: The Room of Indulgence

This room is 30’ long by 25’ wide and made of well-cut stone. There is a rotting chaise lounge and a table on one side of the room and a small fountain still slowly bubbling away in the center. A shattered glass opium pipe can be found next to the chaise. The walls of this room are painted with pictures of various species engaged in graphic sex acts. Humans, elves, dwarves, halflings, orcs, goblins, and even the mysterious cat-people from the jungles of the southern continent are depicted.

  • South: The heavy hinges of a door hang on the south wall next to a short 15’ long corridor that leads into a partially collapsed room to the south.
  • East: This wall bears a wooden door that slides into a pocket in the wall. Beyond it a 5’ wide hallway leads 30’ east to a larger hall past that.

3/28: The Collapsed Room

The original size of this room is impossible to ascertain, as most of the ceiling has collapsed in the decades since its creation. A strong sour, almost metallic smell permeates the room. There is an almost-imperceptible sound of something wet moving about in the darkest depths of the room.

  • North: The door that used to separate this room from the hallway to the north is missing.
  • The Lair: This room has become the long-term home of an Ochre Jelly. The amorphous creature hides among the debris of the collapsed room, waiting and watching. If characters decide to poke around or enter the back of the room where the Jelly is hiding, the Ochre Jelly will attack. It will otherwise avoid combat in its own lair.

 3/29: The Ransacked Tomb

This 35’ long by 20’ wide room has an air of abandonment to it. Only flecks of amber paint and the lingering smell of cedar greet characters who enter here. A heavy stone sarcophagus dominates the room. It is an ornate karst-stone box. The lid is painted with a demon’s smiling maw where the head would be, and a sculpted pair of antlers sprout from it.

  • North: The thick stone door that allows entry to this room has been partially destroyed. Remnants of the door can be found scattered about the hallway that connects to this room.
  • The Sarcophagus: This large stone sarcophagus’s lid has been pulled to one side and the interior has been ransacked. Corpse parts and rags are all that remain of the burial box’s contents.

3/30: The Sarcophagus

This 35’ by 20’ room has its walls painted in repeating geometric patterns of amber triangles and red squares. The scent of cedar and incense still lingers in the air here. A large sarcophagus of pinkish stone dominates half of the room while an ornately carved wooden bench piled with various grave goods occupies the other half.

  • South: A thick stone door on this wall is carved all over with eyes of various sizes. The door is stuck shut and will require force to open.
  • The Sarcophagus: This large stone sarcophagus has a heavy stone lid (combined Strength of 20 needed to lift it). Underneath the lid the desiccated mummy of an Akrakogi noble lays, wrapped in gold and gems. Atop the remnants of the body 2d4 Giant Centipedes writhe and wriggle. They have found their way in here through the bottom of the sarcophagus and have made this their lair. The corpse’s adornments have mostly fallen to the bottom of the sarcophagus, but with some time spent searching, characters will find 900 gp in gold and gems. Among this treasure can also be found a Ring of Weakness.
  • The Grave Goods: The bench itself weighs around 200 pounds and is worth at least 2,000 gp. It is inlaid with lapis and ruby and painted with gold paint. Atop the bench are piled various ceramics (in total worth 400 gp), a golden tabletop candelabra (200 gp), a golden drinking set with ruby and pearl inlaid into the rim of the cups (300 gp), an ornate Kes set (the board game of kings, worth 150 gp), and handful of ushabti (small votive statues meant to guard a person in the afterlife.)

3/31: The Redoubt

This 40’ long by 20’ wide chamber is strewn with rubbish. Piles of broken crates and old rotting cloth have been piled into a rough barrier that separates the western half of the room from the eastern half. This is the temporary redoubt of a group of adventurers known as the Iron Barbers. The makeshift fortification grants some protection for the group of adventurers while they sleep. Caltrops have been strewn about liberally directly in front of the makeshift fortification to punish would-be assailants for assaulting the barricades directly. (The light green area in front of the barricade)

  • South: There is a wooden door that allows entrance to this room on the southern wall. An illusion has been cast on the 15’ hallway that links this room and the colonnaded hallway south of here. With casual examination, the hallway seems to be blocked up by a collapsed roof. If physical contact is made with the illusion, the character that touched it must succeed at a Spell save or they will continue to be fooled by the illusion.
  • East: There is a passage on the eastern side of the room that links this room to room 4/1. The first 15 feet of the passage on this side has been scattered with caltrops to guard against attacks from that direction. (The three light green squares in the hallway indicate the part of the corridor has been covered in caltrops.)
  • The Adventuring Party:  The party consists of five adventurers and their three porters. There is Feadoc the Fighter (level 4) who wields a great sword and a long bow, Nedrys the Elf (level 3) who is armed with sword, short bow and spell, Allan the Cleric (level 3) who is armed with a mace, Oollona the Illusionist (level 3) in her coat of many pockets, and Olander, the party’s other Fighter (level 2) who carries a large war axe and long bow. The three sallow faced porters are Hagen, Letz, and Akresh. Though Feadoc is the de facto leader, Ollona is his second in command and speaks for him in most cases. The Iron Sworn have been holed up here for almost a week, healing from a nasty encounter with the Orcs on this level. The party tends towards the Chaotic and are suspicious of overly friendly types. The Iron Sworn have hidden their stash of treasure under the makeshift barricade in the north of the room. It contains 800 gp, and five silver goblets with onyx rims (150 each). Feadoc is willing to work with PCs to overcome more formidable foes but will try and backstab the party once he can seize the upper hand.

4/1: An Empty Room

This mostly empty room is 35’ by 25’. The stone walls are covered in soot. In the corner can be found a charred table, and atop it a broken mule harness has been laid. Dried mule droppings can still be spotted in the corners of the room.

  • South: The southern wall holds a simple wooden door with a small, grated window in it. The door guards this room from a small corridor connecting the room to the colonnaded hallway beyond.
  • West: On the western wall a 40’ long hallway connects this room to room 3/31. Roughly the last 15’ of the western end of the corridor is covered in caltrops (as indicated by the light green areas).

4/2: The Colonnade and Grand Stairs

This well-cut stone room is 40’ by 30’ and dominated by a large descending staircase. This staircase descends several flights until it reaches level 4. The room itself opens onto a skillfully carved marble hallway with a beautiful arched colonnade that runs down the center. The colonnaded hall runs for 200 feet and is 10’ wide with three openings in the arched colonnade to allow entry to the rooms across the hall from each other. There is a slightly battered hurdy-gurdy at the top of the stairs, and the air smells of cooked meat, but those are the only signs of habitation in this room.

  • West: A set of two thick wooden doors with iron bandings on the western wall separate the stair room from the hallway beyond.

Sunday, March 19, 2023

March Week Four

 Welcome friends! This week we delve into rooms of danger and delight. step carefully or you might fall prey to a dastardly trap or two. The rewards, you will find, are equal to the challenge. Jewelry, magic, and secrets galore await those brave enough to plum these depths. read on to see a room of undersea beauty hiding dangers galore, a room of treasures and transporters, and a trap that preys on the very thing that brings adventurers into the darkness in the first place... 


Week Four


3/20: The Fountain Room

This large 65’ by 45’ room houses an ornately-sculpted fountain. The peeling paint on the walls in here is made to resemble an underwater scene. There is a U-shaped white marble half wall that separates the large fountain in the center of the room from the wall around it. The half wall is delicately carved to resemble corals and sea plants, giving the room the look of an underwater garden. There are two pools set in the floor, a larger one in the west which drains into a smaller pool to the east. There are 3d20 gold coins scattered between the two pools. Two great green marble statues of sea nymphs stand on either side of the two pools. The air here has a sour note to it.

  • North: A heavy iron door hangs on this wall. Above it, the inscription “He who holds the Pearl shall guide the way.”  has been carved. The corridor beyond the door is covered in green tiles sculpted to look like the scales of a snake. It glows a spectral green. Halfway down the corridor a floor tile is glazed with a coiled serpent instead. (See room 3/22 for further details.)
  • East: The heavy brass door on this wall has been cast with scenes of frolicking dolphins on the inside and scenes of sharks devouring people on the outside.
  • West: Behind the marble screen that rings the room on this side is a secret door. Next to the door, a frolicking starfish with lots of wear on it can be rotated until the sound of stones grinding between the walls can be heard. When the noise stops, the hidden door is revealed.
  • The Fountain and Sculptures: Though the waters here may look crystal clear and potable, they are in fact a powerful acid. The acid deals 2d6 damage to anyone who touches it. The acid will corrode any organic matter it encounters, fully consuming a body in 24 hours and leaving only metal behind.

3/21: The Teleporter Room

This 25’ by 30’ room can be found at the end of a small hallway hidden by a secret door. The ceilings here are only 10’ tall, and the walls are of roughly hewn stone. At the back of the room, a large magic circle has been fashioned on the floor next to a metal box with a number of glowing gem-colored protrusions and odd handles. In the southern end of the room, a heavy wooden chest with a built-in lock sits, waiting for someone to open it.

  • South: The entrance to this room is guarded by a stout wooden door banded in iron staves with a heavy brass lock on either side. The key in room 3/13 will open this door.
  • The Chest: This heavy mahogany chest has been enchanted against physical harm. The built-in lock is not only gorgeously fashioned out of brass, iron, and copper elements, but hides a concealed needle trap. If the key from room 3/14 isn’t used to open this lock, the needle will pop out from the lock and stab the hand of the opener (take 1d8 damage and succeed at a Poison save or fall unconscious for ten minutes. Inside the chest is a sack of 700 gold coins stamped with the face of Oxyus, two gold and silver armlets studded with grape bunches of emerald, ruby, and jade (650 gp each), a Luck Stone, and 2 jars of Restorative Ointment
  • The Teleporter: This odd contraption resembles the teleportation pads in rooms 2/8 and 2/11. Similarly, with the right combinations of button presses and lever pulls a person can successfully teleport to any other pad in the dungeon. There is a degraded and weathered panel on the front of the control surface that shows directions to six different rooms, although only three are still legible. Those rooms are 2/8, 2/11, and 4/11.

3/22: The Research Library

This room is a simple 30’ square and appears to be some sort of arcane study. The room contains an L-shaped desk with chairs on either side and two bookshelves. The desk is strewn about with moldering papers, a large brass orrery, a verdigris-crusted astrolabe, ancient star charts, a cracked glass mirror, and what seem to have been various plum bobs. The books on the bookshelves are mold-ridden and ancient.

  • North: Behind the desk and to the left of the bookshelf, a secret door is hidden. A switch hidden under the desk reveals and unlocks the door. A corridor beyond leads to another secret door, although it looks like a normal stone door from this side.
  • South: There is a 55’ long hallway that leads to this room from the south. A locked heavy iron door blocks entrance into room 3/22 from this direction. The key from room 3/13 opens this door. Above each of the doorways, the inscription “He who holds the Pearl shall guide the way.” has been carved. The floor of the hallway is covered in green tiles sculpted to look like the scales of a snake, but halfway down the corridor a floor tile is glazed with a coiled serpent on it instead. It glows a spectral green.  The floor is scattered with a trace of sand. Anyone who steps onto the coiled serpent tile without the key from room 3/13 will magically activate a trap! As soon as someone steps across the tile without the key, the doors at both ends of the corridor will slam shut and lock. Once this happens, stone grates slide open and sand starts pouring into the corridor. It will take twenty minutes for the sand to fully fill the chamber and smother anybody inside alive. After the first ten minutes though the volume of sand in the corridor will become great enough to hamper efforts to escape.
  • East: A 30’ long hallway once connected this room with another hallway to the east, but it has been completely filled with sand at some point. Sand has managed to burst through the heavy metal door on the eastern side of the room and pools around the doorway.
  • Bookshelves: The bookshelves in this room are filled with mostly rotten and molding book remnants. Diligent searchers will find a scroll of Wizard’s Lock and Locate Object.

3/23: The Greed Trap

This room is another 30’ square, but it has a 20’ long hallway leading to it from the west. This room is filled with corpses. In the northeastern corner there is a pile of rags and the disarticulated bones of three people. In the northwest corner a long-ago mummified corpse of a human in rusted chainmail is sprawled, and in the western corridor the mostly rotten body of a Goblin slumps against the wall. In the south of the room is an open treasure chest containing a drawstring bag filled with coins. The smell of rotting flesh is pungent in the air here.

  • East: A simple wooden door leads out of this room to the east.
  • West: At the end of the 20’ long hallway leading from the room is a simple wooden door.
  • The Chest: This entire room is a devilish trap meant to prey on an intruder’s greed. The chest originally contained four bags of 50 silver coins each that had been stamped with the face of the wizard Oxyus on one side and a serpent’s eye on the other. This treasure is cursed to never leave the room. Anybody who tries to leave (whether on foot or by magic) while in possession of even a single coin will find themselves re-entering the room from the opposite side. Outside of disenchanting the coinage, there is no way for someone to leave with it. The treasure can now be found spread out among the corpses (see entry below), save for a single untouched sack of 50 coins that still occupies the chest.
  • The Corpses: Three bags of special coins from the chest in this room can be found among the piles of ancient bones and rags, along with three golden finger rings (55 gp each) and two onyx-studded silver bracelets (100 gp each). The body in the northwestern corner has been here long enough to desiccate. The corpse has seven special coins in their pocket and a sack with ten iron pitons in it. The corpse of the Goblin is bloated and smelly. It is clutching a single special coin.

3/24: The Armory

This room is 45’ long by 40’ wide and made of roughly cut stones. A pile of crates and three large cabinets occupy the southern side of the room. Rags, half-eaten food, rat droppings, and all manner of debris has been scattered on the floor in here. The stench of human sweat and rat shit permeates the air. The shine of beady rat eyes can be seen glinting from the edges of the torch light.

  • North: This wall bears a stout wooden door that appears to be stuck. Behind the door, a corridor leads to an impressive colonnaded hallway running east to west. 
  • West: A 20’ long hallway running east to west connects this room to a perpendicular corridor that runs south. The door between these halls is made of battered wood and has been painted red.
  • Crates and Cabinets: There are all manner of preserved foodstuffs and daily necessities in the barrels and crates. Each cabinet holds an assortment of old weapons. There is a cabinet filled with short swords, a cabinet filled with axes, and a cabinet filled with spears.
  • Guards: The room is guarded by 3 Wererats hiding in their Giant Rat form, alongside 1d4 regular Giant Rats, and two groups of 2d6 Rats each that take commands from their Wererat masters. The Wererats prefer to hide at the edge of the light and will only engage in combat if supplies are being stolen from the room. A rat will be sent to alert Warrik in room 3/19 if PCs tarry here.

3/25: The Torture Room

This 40’ square room is fashioned from dressed stones with a hand-sized brass grate in the center of it. This place bears the marks of torture. A large torture rack occupies the northern end of the room, and stool, a bloody table, and a pail full of rusted torture implements make up the rest of the room’s contents. Blood stains everything in this room, and the coppery smell of it permeates the air.

  • East: A purple wooden door on the east wall connects this room to a 55’ long hallway leading to room 3/4.
  • West: The western wall contains another purple door. This one is stone and shows signs of being hacked at. Beyond the door the corridor extends west for 25’ and then turns south and continues for 40’ before it intersects an east/west hallway. At this T-junction a tripwire has been carefully laid across the east/west passageway on the western side, cutting off the eastern side of the corridor from the western side. If the tripwire is pulled, a cleverly-rigged rockfall will topple down on the square marked T, dealing 2d4 damage to the person who triggered the trap.

3/26: The Chapel of Saint Hyrax

This long 50’ by 25’ room has been cut with precision. Half-columns line the north and south walls every ten feet, and the ceiling here is carved to look like bird feathers. At the eastern end of the room a black basalt altar slab lays waiting. Between it and the entrance are rows of pews. Atop the altar, bone divination sticks, a bloody brass bowl, and a fist-sized carnelian carved into the likeness of a phoenix can be found. Behind the altar, a fresco has been painted on the wall in bright reflective paint depicting a human woman with black floor-length hair wearing pink and orange robes. She wields a staff topped with a carved phoenix. The woman stands before the Sphinx Beoshasalam, guardian of the Temple Beyond Time. This is a famed scene depicting the life of the legendary sorcerer Saint Hyrax the Inscrutable, a saint of Zaltus Embri the Phoenix God of Magic.

  • East: The fresco behind the altar hides a secret door. A careful search of the painting will reveal that the phoenix atop the Saint’s staff is a push button. This button will unlock and open the secret door.
  • West: There is a door on the western wall made of stone and carved with a scene of a phoenix rising from the ashes.
  • The Altar: The basalt altar stone has been carved in repeating geometric patterns of squares and triangles. Atop its surface, the words “Zaltus Embri hear my call, rise now from the ash’s fall. Now awakened, bloom in fire. Bind your will to my desire.” have been carved. The carnelian phoenix carving itself is worth 400 gp.


Sunday, March 12, 2023

March, Week Three

 Week three brings us further into the Crucible of Oxyus, from beautiful rooms covered in bas relief sculptures, to wood paneled studies, to strange experiments in gravity. Read on to explore and discovery what awaits!


Week Three


3/13: The Wizard’s Study

In the western range of the pillared hall there is a perpendicular corridor made of dressed gray-green basalt cobbles. Down this corridor are two smaller doors on either side, a blue door and red door. At the end of the passage there is a set of double doors with a radiant eye painted on each. This is the study of Oxyus of Fenebrahn. The study itself is 30’ long and 25’ wide and is lined with dark wood paneling. Half-empty bookshelves, a desk, and a wooden chair add to this room’s office-like air. There are two human-sized statues placed before the northern doorway. The sound of distant running water can be heard from beyond the western end of the room.

  • North: The 10’ wide hallway is separated from this room by two 15’ tall arched doors made of iron with large copper bands around them. The weight of the doors is so immense an Open Doors check is necessary to heave them aside.
  • West: A stout wooden door separates the room from a 5’ wide hallway that travels further west into the mountain. 30 feet down the hall a T-section branches off to the north. The sound of running water is louder behind this door.
  • The Statues: The Eastern statue is made of moss-covered green basalt and is carved into the coiling serpent of darkness Aboses. The Western statue is made of black and red flecked marble and carved into the likeness of the Phoenix god of magic, Zaltus Embri.
  • The Contents of the Study: The bookshelves here have been ransacked, and only moldering volumes of now-indistinguishable tomes remain. Rat droppings are scattered all around the room. There is a secret compartment in the desk. Inside is a pouch with 25 platinum coins stamped with Oxyus’ face on them and an ornate golden key with a pearl in the handle (worth 50 gp by itself).

3/14: The Bedroom

The is a well-appointed room, 30’ wide by 25’ long. In the corner, a massive canopy bed can be found. Next to that is a small side table with an ancient ceramic oil lamp resting atop it. The walls of this room have been painted to resemble some distant northern forest, showing endless pine trees and brambles with the occasional fox or buck peaking around a tree. Smelly piles of rubbish have been piled up in here. The bedding has been wadded up like a nest and large rats can be seen residing there.  Those who disturb the rats on the bed will be attacked by three rat packs consisting of five Rats each.

  • South: There is a simple wooden door leading into a hallway that travels south to a T-section. The door has been splattered with old blood. The distant sound of running water can be heard from behind it.
  • East: Down a 25’ long corridor to the east, a locked, blue-painted wooden door can be found. The key in the secret compartment in room 3/13 will open this lock.
  • West: There is another simple wooden door on this wall that leads down a short corridor to room 3/18.

3/15: The Relief Room

This ornate double room is covered in relief sculptures and is split in the middle by an ornate floor-to-ceiling carving with two arched corridors running along the north and south side of it. The room is 50’ long by 25’ wide with 30’ tall ceilings.

  • North: A 25’ long hallway leads into this room from a simple wooden door in room 2/27.
  • East: In the eastern end of the room, a Secret door allows access from this room to the magic fountain in room 3/12. To reveal the door, one must push in the exposed stone heart of a demon carved to the left of the secret door.
  • West: The door on this wall is made of sturdy mahogany wood and opens upon a corridor with empty torch sconces running along it.
  • The Walls: The walls are covered completely in ornate bas relief sculptures of war scenes between pot-helmeted warriors with curved swords and barbed-spear-wielding demons. The demons seem to be winning.
  • The Central Sculpture: This large feature is roughly 10’ wide by 15’ long and depicts the gods of the Akrakogi scrambling up a massive tree trunk, The entire Akrakogi pantheon is depicted crawling up the tree to avoid the demonic onslaught. There is Grudys the Smith, No’Shem the Wise Warrior, Vrundas the General, Mech’el the Sea, Honugas the Trickster, Lartemi the Hunting Mother, Henram the Hearth Protector, Onetri the Lantern Bearer, Menludyss the Earth Mother, Gar the Messenger, and Pemrahn the Solar Father, who is seen standing at the very top of the sculpture. This feature actually hides a secret staircase that descends to the floor below. If the sculpture of Vrundas’s scabbard is pulled up on, a door will open in the grand carving with an audible click. This will reveal the staircase inside that leads down to level 3.

3/16: The Sitting Room

This small 20’ by 30’ room is masterfully cut and polished from the living stone. Two ancient couches on either side of the room and a small moldy armchair sit, waiting for someone to sit down and enjoy them. There are two small tables in this room with ornate ceramic oil lamps atop them (50gp, weighs 10 coins). Rats skitter around the edges of the room.

  • South: This wall bears a wooden door that leads to a hallway in the south.

3/17: The Drain Room

This 40’ diameter circular chamber is bridged by a corridor running east to west through the top of the chamber. The chamber bottom is located 20’ below the bridge, where a grated tunnel allows water coming through from an underground river to the south to pass through the north of the chamber and out. In ages past, this water feature ran swiftly. But because it hasn’t seen proper maintenance in centuries, the water has  slowed to a trickle here as it slowly drains out of the chamber. In the muck and piled up debris of the watery cesspit an Otyugh makes its nest, ready to ensnare those foolish enough to go looking for treasure.

  • The Bridge: This 5’ wide bridge crosses through the middle of the chamber, either end then continuing into a hallway. At about the middle point of the bridge, a cleverly hidden trapdoor has been concealed. If not spotted, anyone who steps on the door must succeed at a Wands save or fall through the door to the waterlogged bottom of the chamber, taking 2d6 damage from the initial fall.
  • The Otyugh’s Treasure: The Otyugh has managed to collect a small trove of loot taken from the corpses of its food. This includes 50 gold coins from a scattering of different nations, a pair of thick golden bracelets worth 200 gp each, and a small sack of 25 silver coins.

3/18: The Empty Chamber

This 20’ wide room is 35’ long and has the smell of mildew about it. The original purpose of this chamber has long since been forgotten, but the five candle nubs in the northwest corner speak to someone having spent some time here in the not-too-distant past. There is also a ratty blanket and two burnt torch ends scattered about in here. Someone has written “head over heels!” in chalk on the northern wall.

  • North: A secret door in this wall can be accessed by uttering the word “silence” while standing in the room. It leads down a long tunnel further into the dungeon.
  • East: A small hallway leads to a door to room 3/14.
  • West: A similar hallway leads to another simple wooden door that leads to room 3/19.

3/19: The Gravity Room

This 60’ long room is 25’ wide and split down the middle by a rotating wall that turns to reveal the other side of the room. Around the north and south ends of the chamber, thick iron rings have been driven into the walls, floor, and ceiling. The rotating wall in the middle of the room conceals each half of the room from the other. Only after a careful search does the rotating mechanism hidden in a false pillar become apparent. In the northern half of the room, a person-sized plinth 4 feet in height with a wide flaring crown can be found. A polished emerald sphere sits in a depression in the center of the plinth and can rotate freely atop it. Next to the plinth a scarred, ratty-looking human fiddles with the odd statuary while his two beady-eyed bodyguards stand around bored. The scar-faced leader is Warrik, and the other two are Davrod and Knyss. Though they appear human, in actuality Warrick and his companions are acolytes of demonic forces - Wererats who have been living in this dungeon and raiding from it for decades!

  • North: Many rusty iron rings have been driven into the walls, ceiling, and floor on this side of the room, ending about 15’ away from the apparent southern wall (the rotating wall). Some of the rings have links of chain attached to them.
  • South: Many rusty iron rings have been driven int the walls, ceiling, and floors on this side of the room, ending about 15’ away from the apparent northern wall (the rotating wall). A small table sits against the northern wall, and chains have been attached through some of the iron rings.
  • East: There is a heavy wooden door with iron banding on the northern end of the eastern wall. It leads to a corridor that connects to room 3/18. On the southern end of the eastern wall an empty doorway can be found, its door missing and its hinges pull off the doorframe.
  • The Plinth: The elaborate stone sculpture is in fact a magical device used to change the orientation of gravity. At one time it worked on the entire dungeon, but it has been damaged over the centuries by neglect and now only works within room 3/19. By taking a round of time to orient the sphere atop of the device, a character can set the plane of gravity to any wall, ceiling, or floor in this room. Characters who are not anchored to something (like the metal rings) will suffer falling damage equal to 1d6 per ten feet they “fall” from their initial position to whichever surface becomes down. The jade sphere can be pulled off the plinth and sold as loot (3,000 gp, weighs 400 coins).
  • Warrik and His Minions:  Warrik and his bodyguards have been experimenting with the odd stone plinth since they discovered this room. All three have attached themselves to metal rings to avoid falling while experimenting with the odd device. Warrik is especially cowardly and sly. He will try and grovel if he feels outmatched, at least until he can attempt to convert an enemy with his lycanthropic bite.
  • Warrik, Wererat Leader
    • AC 7 [12] Leather, HD 5** (27hp), Att 1 x bite (1d4) or 1 x Sword (1d8),
    • THAC0 15 [+4], MV 90’ (30’),
    • SV D10 W11 P12 B13 S14 (5),
    • ML 8, AL Chaotic, XP 425
      • -Surprise: on a 1-4; set ambushes,
      • -Languages: can speak Common in both forms.
      • -Weapons: may also uses weapons in animal form.
      • -Spells: Warrik can use the spells Wraithform, Color Spray, and Invisibility once a day.
    • Seeming: Warrik appears in human form as a ruddy brown-haired man in his middle years with a livid scar across his left eye. He is dressed in filthy rags and rather well-kept leather armor. When in his rat form, Warrik retains his hair color and the scar across his eye.
    • Desires: To rule the dungeon as a greater master than the wizard Oxyus himself. To free Ssrazzbazzortch in room 3/6. To drive the Orcs on this level from the dungeon entirely.
    • Means: Besides possessing a spell book with Color Spray, Invisibility, and Detect Illusion, Warrik leads 10 Wererats and an innumerable amount of Rats and Giant Rats. He has learned much of the layout of the first three levels of the dungeon from his conversations with his rats. This includes many of the secret passages as well. 


Sunday, March 5, 2023

March Week Two

 Whether bargaining with a demon or counting your piles of treasure, this week's dungeon is filled to the brim with old-school fun. Join me as I catalogue the wonders of the wizard Oxyus and his triumphant treasures. Read on to find out what more the second level of the Crucible has in store for the curious and the bold!  


Week Two:


3/6: Prison of the Demon

This immense chamber is 60’ long by 55’ wide. Its 80’ tall ceiling is held up by six massive pillars. The center of the room is dominated by a gigantic 65’ tall statue of a robed human with a scholar’s fez made of red and green marble. The figure has their left arm clasped behind their back and their other is arm outstretched and holding a person-sized cage. Within the cage a dull red flame flickers, casting the whole chamber in its eerie glow. A carved marble placard reads “Oxyus Har’Daxos, who tread the world underneath his sandaled feet.” The air here smells of sulfur and blood.

  • North: A copper door on the north wall opens to a hall that leads to room 3/7.
  • South: An identical copper door with a similar hallway leads to room 3/8.
  • East: The eastern wall contains a heavy ceramic door, glazed in red. It is sculpted with a depiction of a heart with a tree growing from it. This door leads to a set of stairs that descend 25’ to a green tiled corridor that leads under room 3/9 to room 3/10.
  • West: This wall contains two massive 15’ tall copper doors sculpted with the screaming face of a demon. These doors have no visible means of opening. One must rotate both of the demon’s eyeballs until the pupils can no longer be seen, then the doors will open with an audible “click”. Even unlocked, however, the doors remain a heavy obstacle, requiring a successful Open Doors check to push them open.
  • The Demon Ssrazzbazzortch: Ssrazzbazzortch is an ancient and powerful demon. Legend tells that he cracked the world of faery open and drove the elves into the mortal plane. It also said that he could melt entire kingdoms to glass with his fiery breath.
    • Seeming: The demon king of the accursed lands of Gorch resembles a rolling black cloud of fire in the shape of a humanoid. His eyes are glowing embers, his tongue a licking flame. When he is still and content, he dims to candlelight. When roused to anger, he roars as brightly as a furnace.
    • Nature: Ssrazzbazzortch has the air of a curious aristocratic about him and is polite to a fault. Like all greater demons, Ssrazzbazzortch is bound by the ancient laws of courtesy.
    • Desires: Though he desires most of all to be freed from his prison, Ssrazzbazzortch is willing to play the long game and tries to recruit PCs to aid him. Ssrazzbazzortch is bored and would love stimulating conversation at the very least.
    • Means: The demon lord will reveal the location of treasure if the PCs  agree to face him in a game of skill (chess, checkers, etc.). If the PCs win, he reveals the location of a yet-unknown compartment on the statue that contains a pearl necklace with a fat ruby pendant (300 gp). If Ssrazzbazzortch wins, he asks the PCs to search this level of the dungeon for a library of black stone and a fountain shaped like a shell. The demon would like a volume from the black archive titled “Demonia Esoterica” and a dram of water from the fountain. He will give no reason for wanting these things save to say that he is merely thirsty and bored. In reality, the demon will use these items to ensorcell the leader of the Wererats on this level to be his willing servant. Ssrazzbazzortch is willing to teach a PC who swears their soul to him the spell Wraithform (may be cast once a day as a level 5 Illusionist), but this will bind them to his service even after death (he omits this part unless asked directly).


3/7: The Ritual Room

This elaborately tiled room is 50’ long by 30’ wide. Four large brass tables occupy one half of the room. Atop each table an eight-foot-long skeleton stained green by verdigris lays. Each table has an identical brass bucket at one end. These tables have the aspect of a ritual butchering table, complete with blood gutters that drain into the brass buckets. walls of this chamber are covered in tiles of red, black, and green in the concentric circles and intersecting lines of geomantic ley-lines. The smell of old blood hangs heavy in the air here.

  • South: A wooden door in this wall leads through a corridor to room 3/9.
  • East: There is a 10’ tall, black tiled arch that leads to a descending stairway. The stairs descend 25’ to a black tiled corridor below.
  • West: The western wall contains a copper door that slides into a pocket in the wall.
  • The Skeletons: These skeletons (3 HD, take half damage from non-magical attacks) are the reanimated bones of extremely tall humans, bred for this purpose by Oxyus’s cult. They will animate and attack anyone who enters the room. They can be commanded to stop by uttering the word “silence”. Afterwards they will obey commands by the utterer, but may interpret them literally.

3/8: The Altar Room

This room is 50’ long by 30’ wide and made of dressed stone. A large verdigris-covered brass altar table is the only thing in this room. The altar is studded with semiprecious green stones (25 in total, worth 10 gp a piece) and a simple clay offering bowl sits atop it, empty.

  • North: A wooden door in this wall leads through a corridor to room 3/9.
  • East: There is a 10’ tall, black tiled arch that leads to a descending stairway. The stairs descend 25’ to a red tiled corridor below.
  • West: There are two doors on the western wall. There is a visible copper door that slides into a pocket in the wall, and beside it, a Concealed rotating stone door. The Concealed door can be spotted by the seam on the wall and by the air current that sputters PCs’ torches when standing in the room.

3/9: The Treasure Vault

This 45’ long by 25’ wide room has polished crystal mirrors on the walls and huge flagstones alternating between black, red, and green marble. The red flagstones are all carved with a blood drop in their center, the black flagstones are all carved with a cloud at their center, and the green flagstones are all carved with a tree at their center. The air here carries the slightest hint of ozone in it.

  • North: There is a trapped, locked wooden door on this wall carved with a repeating diamond pattern. The door leads to room 3/7. In the northern hallway that leads to this door are two iron torch loops studded with nasty spikes. If a torch or something of similar weight isn’t placed in the eastern loop before the door is opened, the western loop will fire out of the wall by a spring mechanism and skewer a PC standing in front of the door. (1d8 damage, save vs. Death for half damage) The weight of a person standing in front of the door from inside room 3/9 when opening the door will also temporarily disarm the trap.
  • South: There is a trapped, locked wooden door on this wall carved with a repeating diamond pattern. The door leads to room 3/8. In the hallway that leads to this door are two iron torch loops studded with nasty spikes. If a torch or similar weight isn’t placed in the eastern loop before the door is opened from that side, the western loop will fire out of the wall by a spring mechanism and skewer a PC standing in front of the door. (1d8 damage, save vs. Death for half damage.) The weight of a person standing in front of the door from inside room 3/9 when opening the door will also temporarily disarm the trap.
  • The Mirrors: Anyone who looks in the mirror will see a reflection of the room that is different than what’s actually within it. The reflection from the mirrors shows the room filled with gold and other riches as well as a pull-handle dangling down from the ceiling to the center of the room. If a PC observes themselves in the mirrors while reaching for the handle, they will feel it in their hands as though it were truly there. If the PC pulls on the handle while still looking at themselves in the mirrors, the treasure will instantly appear in the room.
  • The Treasure: The horded treasure contains 2,000 silver coins, 1,700 gold coins, six gold bracelets set with semiprecious stones (100 gp each), 18 gold finger rings adorned with precious stones (200 gp each), two large silver chalices (50 gp each), four large gold chalices (150 gp each), six silver candle sticks with pearl inlay (250 gp each), a small white marble statue of the Mother Goddess D’runa with an attached golden cape (1,000 gp), and two greenish-blue potions in fluted bottles (potions of polymorph).

3/10: The Cenotaph

This 45’ long by 55’ wide oval chamber has been plastered white to reflect as much light as possible. The ceilings are over 80 feet high here and the room is dominated by two large statues of the wizard Oxyus, dressed similarly to the larger statue in room 3/6. There are two long stone benches set facing each statue as well. Chipping and falling plaster from the ceiling litters the floor in here, sitting like dust upon the statues’ shoulders. The wall is ringed with iron lanterns containing clear crystals that glow with the bright white light when a living creature enters the chamber.

  • North: A heavy ceramic door, glazed red, opens onto the room from the northern end. It is attached to a long, black-tiled corridor that leads back up to room 3/7.
  • South: A heavy ceramic door, glazed red, opens onto the room from the southern end. It is attached to a long, red-tiled corridor that leads back up to room 3/8.
  • West: A heavy red glazed ceramic door on the western side of the room opens onto a tiled green hallway that leads back up to room 3/6.
  • The Statues: Both statues depict the same 25’ tall human and both are dressed the same as the statue in room 3/6, although they are posed differently. The northern statue is bent down on one knee, playing a lyre. The lyre is strung with strings of silver (50 gp of wire in total). The second statue is standing and holding a large open tome. Those who sit on the benches will see the statue they are facing project an illusory image of the wizard as a boy, frolicking in his native home. A variety of small scenes play out like a short montage in a movie. Some of these scenes include the boy playing among oak trees, the boy drinking from a crystal-clear stream in a meadow, the boy laughing, and the boy finding a gold coin in a woodland creek. The scenes repeat for as long as someone is sitting on a bench. Close examination of the southern statue reveals a hidden compartment that holds a Short Sword +2 of Quickness and a Scroll of Invisibility.

3/11: The Room of Ash

This room is 25’ wide by 40’ long. The entire room is filled with a two-inch layer of ash. If PCs are not careful while moving through the room, they will kick up clouds of dust, forcing a save vs. Breath Weapon. On a failure, the PCs will begin coughing (forcing a wondering monster check due to the noise).

  • East: The heavy bronze door on the eastern wall of this room is connected to room 3/8 by a 45’ long hallway.
  • West: This wall contains a stuck heavy wooden door that has swelled shut due to moisture.

3/12: The Hidden Fountain

This roughly-cut stone room consists of a main circular chamber 25’ in diameter with an apse 20’ long by 15’ wide attached. The ceilings here are only 10’ tall. In the center of the circular chamber is a stone fountain carved to look like a giant clam shell.

  • North: In the north of the room is a simple wooden door with a bar across it to prevent access. Through the door, a small, green-tiled hallway winds its way to a secret door concealing an entrance from the large, pillared hallway to the east of room 2/27. The lintel above the secret door in the green-tiled corridor reads “silence” in an old script. Speaking the word out loud opens the doorway. This works on either side of the door.
  • West: The western end of the apse contains an arched wooden door affixed with hammered copper plates. This door opens onto a hallway that leads further into the dungeon.
  • The Fountain: The chaotic waters of this fountain taste slightly of winter mint. If drunk, the waters of the fountain grant the imbiber permanent infravision up to 30’. Those who drink of the fountain must succeed at a saving throw against Magic or have their Alignment permanently changed from Law to Neutral, or from Neutral to Chaotic (those who are already Chaotic receive 1d4 hp of healing instead).


Bone Fire

  Welcome once more weary travelers! This week I'm bring you a new article for the RPG Blog Carnival and this month's theme of part...